LavryGold voltage setting
Overview
LavryGold products are manufactured with a Power Entry Module (PEM) that contains a fuse holder and an AC power voltage selector, in addition to AC power line filtering. The following procedure can be used to set the AC power operating voltage or access the fuses. The Synchrony-16 is also made with the same PEM.
Please see Voltage setting for a complete list of LavryGold products which require the AC power operating voltage to be set manually.
Exceptions
Current production LE3000s units do not have the power input module, and adjust automatically to AC power inputs in the rated range.
Procedure
The Power Entry Module (PEM) is a multi-function unit where the AC power cord plugs into the converter. It has an AC power switch and a fuse holder in addition to the IEC C14 AC input receptacle.
- The LavryGold DA924 and DA2002 must be set to the proper AC line voltage before power is applied!
The following procedure is to access the fuses or change the voltage setting.
The fuse holder is red in color and also serves as a voltage selector. To change the voltage setting, simply re-insert the fuse holder rotated by 180 degrees so the proper voltage is seen when you close the door.
- For other current production Lavry models including the AD122-96MkIII/MX, DA-N5, and Synchrony-16 the voltage selector is wired in a manner that defeats the voltage selection function. It is safe to operate the unit with the voltage selector in either position (“115V” or “230V”) as long as the input AC voltage is between 90 and 264 VAC.
You may still need to access the fuses. Here is a short procedure to do so.
We suggest using a flat blade screwdriver to begin the process of opening the “door” on the PEM that covers the red fuse holder. There is a latch that keeps the door closed in the center of the tab, so we recommend placing the tip of the screwdriver just above or below the center of the tab.
This photo shows the Quintessence DA-N5, but the process is similar for all other models. The voltage setting appears as white lettering on the red background:
Once the latch releases, you can open the door completely by hand. This photo shows the door half-way open. The door latch is visible where it overlaps the red fuse holder:
Use a flat blade screwdriver to pry the red fuse holder out of the PEM far enough to release it. Remove it completely by hand. Please do not pry on the corners of the fuse holder as they can be damaged in the process. There is a slot in the side of the fuse holder for the tip of the screwdriver:
Updated Information
The type of fuse has changed in newer production from the larger ¼” x 1 ¼” size to the smaller 5mm x 20mm size. Either size fuse will work properly, but both fuses installed in the fuse holder should be the same size. If you change from the ¼” x 1 ¼” size to the 5 x 20mm size, change both fuses.
DA924 & DA2002
The rating of the fuses is still the same for the DA924 and DA2002:
- 115 volts operation requires two 1/2 ampere 250 volt fast blow fuses
- 230 volt operation requires two 1/4 ampere 250 volt fast blow fuses
AD122-96MkIII/MX,Quintessence DA-N5, and Synchrony-16
The LavryGold AD122-96MkIII,AD122-96MX, and Quintessence, as well as the Synchrony-16 adjust to the AC power input automatically, and can safely operate with either 115 or 230 visible as the selected voltage on any AC power within the specified range of 90-264 VAC @47-63Hz.
- The AD122-96MkIII and AD122-96MX can use the same two 3/4 ampere 250 volt fast blow fuses for 115VAC or 230VAC operation. This supersedes the former recommendation of 1/2 ampere 250 volt fast blow fuses. New production units ship with 750mA (3/4 Ampere) 250 V FAST fuses installed.
- The Quintessence DA-N5 can use the same two 1.25 ampere 250 volt slow blow (Time Delay) fuses for 115VAC or 230VAC operation.
- The Synchrony-16 can use the same two 1/2 ampere 250 volt slow blow (Time Delay) fuses for 115VAC or 230VAC operation.
5mm x20mm fuse installation
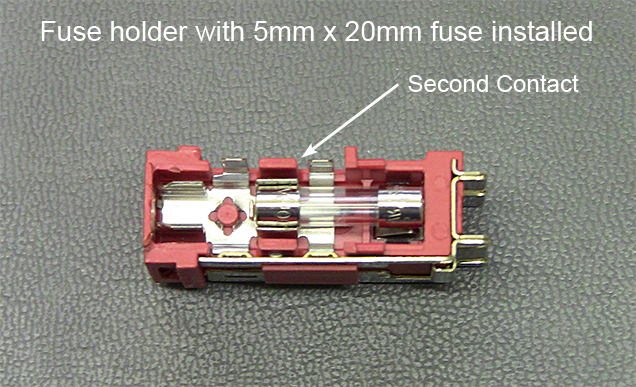
There is a second contact near the middle of the opening in the red fuse holder/voltage selector. When the larger fuses are installed, this spring-loaded contact is pressed down by the glass body of the fuse, making it difficult to see.
The photograph below shows the 5 x 20mm fuse installed. The arrow points to the second contact.
We recommend inserting the end of the 5 x 20mm fuse into the second contact, then pressing the other end into the fuse holder. Please refer to the procedure above for information on accessing the red fuse holder/voltage selector and setting the desired voltage.
When re-inserting the fuse holder, it is important to press it straight into the PEM to avoid dislodging the fuses from the spring-loaded contacts. If the unit does not power “on” after inserting the fuse block, check to be certain one of the fuses did not become dislodged when the fuse holder was inserted into the PEM.
Please be certain the fuse holder is fully inserted into the PEM before closing the door. If the door does not close completely, open it and try pressing firmly on the fuse holder to fully insert it into the PEM.
If you have any questions, please contact Lavry technical support via the Help Desk. The Help Desk is available via the “Technical Support Requests” link under the SUPPORT tab of our website. Once logged into the website, the My Support Tickets page will appear.


